How To Upload Images on the back-end of Nomadicways.travel
Posted by Ayanda Khuzwayo on 19 October 2018 9:05 AM CAT


Dear LTA Champions - - - Okay I start off with saying this. A picture speaks 1000 words, so having quality images makes your business really stand out from the rest.
The process of uploading an image is quite easy, when you follow these steps:
Firstly you would will need to login to http://www.nomadicways.travel with your login details. You need to keep in mind that it depends what kind of images you want to link to the content you wish to share.
Now say you ate at your favourite restaurant, now you want to share the experience with your friends and contacts. Once you have logged on, click on ORGANIZATION, you will then choose your LTA profile.
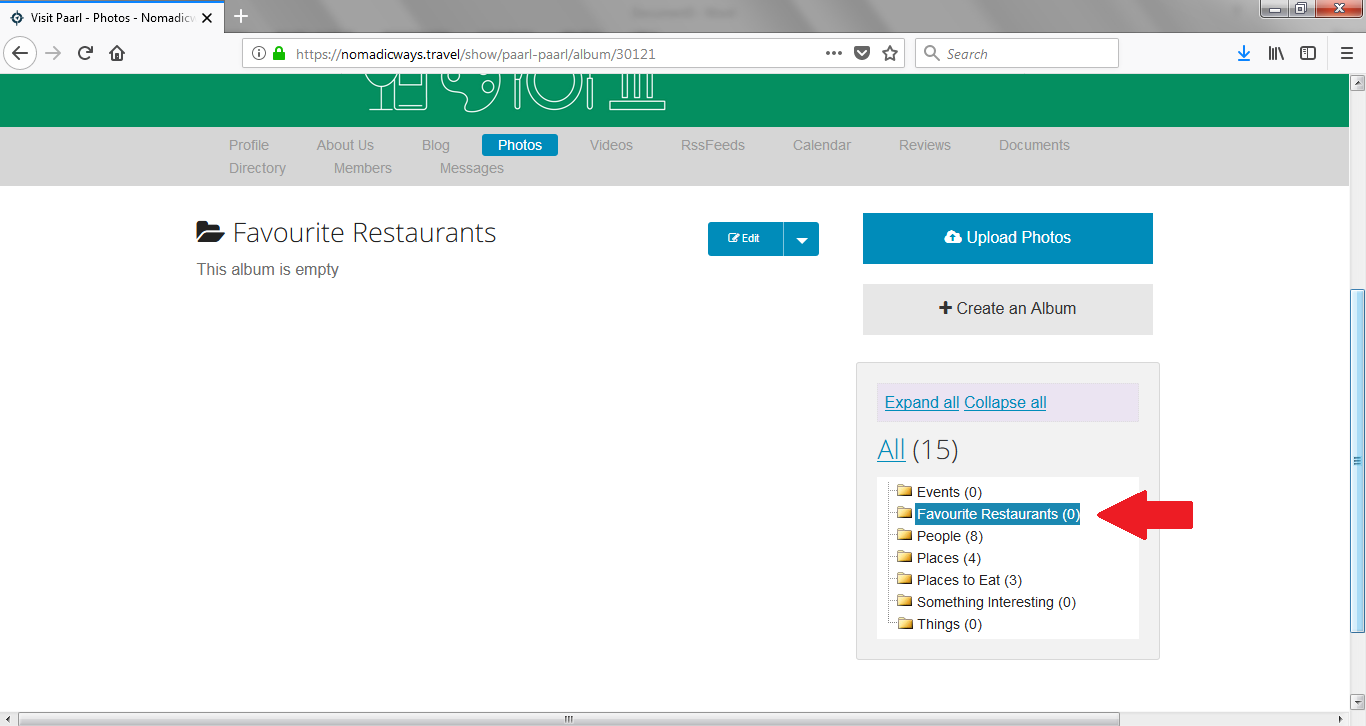
-Once this step is done, you can navigate around to find the following tab: Photos. On this page, you will already see some images you may have uploaded before, but to enhance this space, even more, you can create your own folders relating to your experience. For the purpose of this explanation, we will create a folder.
-You will see at this section on your right-hand side there is block that reads +Create an Album (see Illustration 1.A); you can create and/ or custom rename your folders (as seen on 2nd image).
.png)

Secondly now that your folder has been created, you can go ahead and upload your image/ s in the respective folder.
-You can click on the folder where you would like to upload your image/ s, the blue block on your right-hand side that reads; Upload Photos – Here you will upload your images, so click on that option.
-You will then add your images then upload it, depending on your internet speed and the size of the images, may take time to upload should your images be large in size. So (1) +Add files…, then click (2) Start upload (As Illustration 1.B).
.png)
Illustration 1.B
So once images have been uploaded, you can add a caption – Keep in mind that you should keep it short as possible, if the caption is too long, it may cause this section to malfunction.
Now once your images have been uploaded on your respective profile, this is what your images will look like on the back-end in your respective folder (see Illustration 1.C). Images can be viewed on the mobile app in real-time as well.
.png)
Illustration 1.C
Please feel free to leave a comment on the comment section, any input most welcome.................. Happy uploading :-)

.png)
.png)